
Regulador De Tensão 1,5-32 V 5 A - Volt Amper Caixa Case T6
+50
Vendas concluídas

Ofereça um bom atendimento

Entrega os produtos dentro do prazo


Características do produto
Características principais
Marca | GEN |
|---|---|
Modelo | 5 - 36v - 5a |
Outros
Tipo de regulador | TENSÃO |
|---|---|
Voltagem mínima de entrada - Voltagem máxima de entrada | 2V - 40V |
Voltagem mínima de saída - Voltagem máxima de saída | 1V - 32V |
Corrente máxima de saída | 5 A |
Com voltagem de saída ajustável | Não |
Descrição
- CONVÉM SEMPRE LER TODO O ANÚNCIO -
- CONVÉM OBSERVAR ATENTAMENTE AS FOTOS -
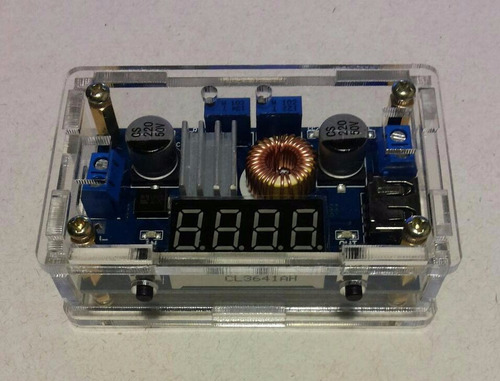
REGULADOR DE TENSÃO
DC - DC
(CORRENTE CONTÍNUA - CORRENTE CONTÍNUA)
COMPRANDO, RECEBERÁ O MÓDULO APRESENTADO NAS FOTOS.
ENTRADA ENTRE 5 E 36 VOLTS
SAÍDA DE 1,5 ATÉ 32 VOLTS
CORRENTE MÁXIMA 5 AMPÉRES
(TODO MÓDULO OU COMPONENTE, AO SER UTILIZADO EM SUA
CARGA NOMINAL MÁXIMA, DEVE TER EXCELENTE REFRIGERAÇÃO)
DISPLAY: VOLTÍMETRO / AMPERÍMETRO
NENHUM CABO, FIO OU CONECTOR ACOMPANHA O REGULADOR
A CAIXA DE ACRÍLICO SERÁ ENVIADA DESMONTADA
- FACÍLIMA MONTAGEM. OBSERVE AS TRÊS ÚLTIMAS IMAGENS -
GRANDE ESTABILIDADE E EFICIÊNCIA!
MANUAL, ESPECIFICAÇÕES, DESTAQUES - EM INGLÊS
(CASO NÃO CONCORDE COM O MANUAL EM INGLÊS,
POR FAVOR NÃO COMPRE)
1.Module with crystal shell, safer and more beautiful.
2.Contains the voltmeter, ammeter, power meter, USB interface for charging the digital products.
Note:
1.When you use the product, the module inputs and outputs to be isolated from ground.
2.USB output voltage is consistent with the module, not a fixed 5V output. When charging for digital equipment, make sure USB output voltage is 5V.
3.Some customers report: “The module can not adjust the output voltage is always equal to the input voltage.” When you encounter this problem, please counterclockwise rotation of the “voltage potentiometer” 10 laps or more, then use the module you can adjust the output voltage. Because the factory default output voltage of about 20V.
4.Shell assembly is very simple, but "left" "right" "front" panel are directional, you must pay attention during assembly!
Specifications
1.Input voltage range:5-36VDC(Input voltage higher than 6.2V, constant function will be effective)
2.Output voltage range:1.25-32VDC adjustable(Output voltage higher than 6.2V, constant function will be effective)
3.Output current: 0-5A
4.Output power: 75W
5.High efficiency up to 96%
6.Built in thermal shutdown function
7.Built in current limit function
8.Built in output short protection function
9.Input reverse polarity protection: None (if required, high current diode in series with the input).
10. Bare board size:L x W x H =68.2×38.8×15mm
11.Weight: 73g
Application
1.Use as a step-down modules with overcurrent protection
Usage:
(1) Adjust the right button so that “OUT” LED lighted, Digital meter shows the value of output voltage ,adjust the “voltage potentiometer” so that the output voltage reaches the value you want.
(2) Adjust the right button so that Digital meter shows the value of output current;Wire shorted output terminal, then adjust the “current potentiometer” so that the output current reaches a predetermined overcurrent protection value. (For example, the Digital meter displays the current value of 4A, then you can use the module to a maximum current of 4A)
(3) Connected to the load.
2.Use as a battery charger
Usage:
(1) Make sure you need to charge the battery float voltage and charging current; (if lithium parameters 3.7V/2200mAh, then the float voltage is 4.2V, the maximum charging current 1C, ie 2200mA)
(2)Under no-load conditions, adjust the “Voltage potentiometer” so that the output voltage reaches the float voltage; (if to 3.7V rechargeable lithium battery, the output voltage can be adjusted to 4.2V)
(3)Adjust the right button so that Digital meter shows the value of output current;Wire shorted output terminal, then adjust the “current potentiometer” so that the output current reaches a predetermined Charging current value.
(4)Charge turn lamp current factory default is 0.1 times the charging current; (Battery during charging current is gradually reduced, if the charge current setting is 1A, then when the charge current is less than 0.1A, blue lights turned off, the green light is on, which means that the battery is fully charged)
(5)connected to the battery charge.
(1,2,3,4 steps as: Output is unloaded, do not connect the battery)
3.Use as a LED constant current driver module
Usage:
(1)Adjust the “voltage potentiometer” so that the output voltage reaches the value you want.
(2)Adjust the right button so that Digital meter shows the value of output current;Wire shorted output terminal, then adjust the “current potentiometer” so that the output current reaches a predetermined LED operating current.
(3)Connect LED, work.
(1,2 steps as: Output is unloaded, do not connect LED)
Voltmeter and ammeter calibration method:
Module with manual calibration function can correct display precision voltage and current, if you think the current voltage and current accuracy to meet the requirements, do not perform the following operations.
(1) Output voltage calibration steps
Step 1, adjust the right button so that “OUT” LED lighted, Digital meter shows the value of output voltage; Press the right button for more than 2 seconds, release, Digital meter and “OUT” LED flashes in synchronization so that you enter the output voltage calibration mode.
Step 2, press the right button (normal speed), the voltage value is adding up a unit; Press the left button, minus a unit; Due to a unit is less than 0.1V, the minimum voltage display to 0.1V, so you need to continuously press 1-5 times to see the voltmeter change 0.1V, how many times voltmeter change 0.1V by pressing the key, depending on the current display voltage, the higher the voltage, the fewer the number of press.
Step 3, press the right button for more than 2 seconds, release, to exit the output voltage calibration mode. All parameters set to automatically power down to save.
(2) Input voltage calibration steps
Step 1, adjust the right button so that “IN” LED lighted, Digital meter shows the value of input voltage; press the right button for more than 2 seconds, release, Digital meter and “IN” LED flashes in synchronization so that you enter the input voltage calibration mode.
Steps 2 and 3, consistent with the output voltage calibration method.
(3)Output current calibration steps
Step 1, adjust the right button so that Digital meter shows the value of output Current. Press the right button for more than 2 seconds, release, Digital meter flashes in synchronization so that you enter the output current calibration mode.
Step 2,Connected to the load, ammeter in series, adjust the right and left button to change the display of digital meter, so that is consistent with the ammeter display .
- POSTAGEM DAS ENCOMENDAS -
AS COMPRAS EFETIVADAS ATÉ 11H30 NOS
DIAS ÚTEIS TENDEM A IR PARA O CORREIO
NO MESMO DIA. APÓS ESSE HORÁRIO AS
ENCOMENDAS SERÃO ENVIADAS AO CORREIO
NO PRÓXIMO DIA ÚTIL. APÓS 11H30 NÃO
HÁ TEMPO PARA FAZER A EMBALAGEM E
ETIQUETAR - POIS A COLETA NÃO ESPERA.
- CÓDIGO PARA RASTREAMENTO -
APÓS A ENCOMENDA SER EMBALADA E RECEBER
A ETIQUETA, O CÓDIGO PARA RASTREAMENTO É
ENVIADO AO COMPRADOR
- PERGUNTAS E RESPOSTAS -
PERGUNTAS SÃO BEM VINDAS E SERÃO RESPONDIDAS
SEMPRE QUE POSSÍVEL DENTRO DO ANÚNCIO - PARA
QUE SEJAM ÚTEIS A OUTROS INTERESSADOS.
EM RESPEITO AO PRECISO TEMPO DOS INTERESSADOS
SERÃO DELETADAS AS PERGUNTAS CUJAS RESPOSTAS
SEJAM "NÃO", OU QUE A RESPOSTA ESTEJA NO ANÚNCIO,
OU AINDA QUE NÃO TRATE DO PRODUTO ANUNCIADO.
Perguntas e respostas
Não fizeram nenhuma pergunta ainda.
Faça a primeira!